Making a Rotary Tool toolpath
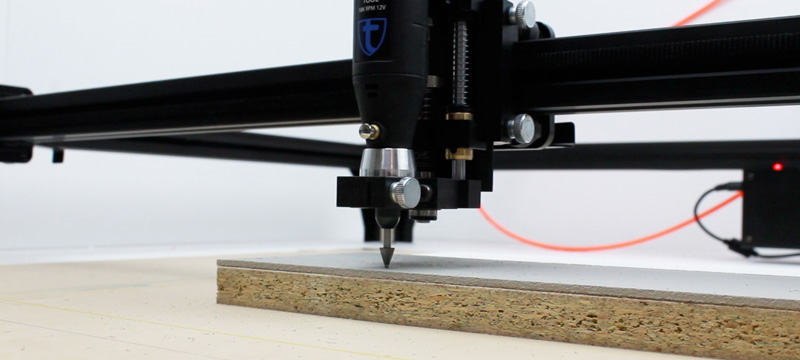
The Rotary Tool is used for light drilling or engraving in soft materials, such as foam or linoleum - as used for block printing.
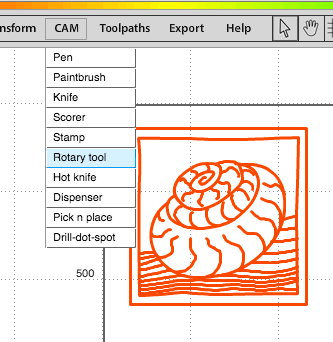
You will be asked to specify the following:
- Toolpath name - This is optional. Allocating a meaninful name allows you to identify and sort toolpaths more easily - this becomes especially important if you are working in a complex file with multiple toolpaths.
- Color Change ID - This is optional. You would use this if you were creating a file with multiple toolpaths and you wish the machine to pause so you can change the tool between toolpaths. For example, during a job you may wish to change the bit in the Rotary tool from a drilling bit to a engraving bit. Tooli will pause operation and Tooli Control will prompt you to install the new tool - at this point it will display the Color Change ID to indicate which 'color' (in this case the bit) is required.
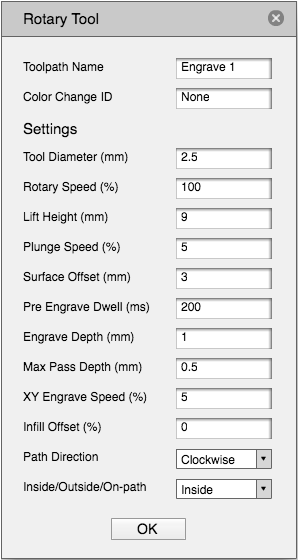
- Tool Diameter (mm) - Specify the diameter of the tool bit. For example a small drill bit for drilling holes may be 1.5mm in diameter. If you are specifying a toolpath for a V-bit (a tapered bit for engraving - as pictured above) base the measurement on the thickness of the line you intend the tool to engrave, this will depend on the plunge depth. The value you enter here will effect how the thick the toolpath appears when you choose 'show toolpath' from the toolbar. This is especially useful to help you judge the outcome when using a thick tool and/or small sized geometry, or when producing an infill. The 'Tool Diameter' data is only used when generating offset or infill toolpaths.
- Rotary Speed (%) - Set the rotary speed here, for example how fast the tool bit spins. The unit of measure is a percentage of the tools maximum rotary speed setting.
- Lift Height (mm) - The height you wish the tool to raise to when moving between toolpaths, for example when rapiding above the surface and not drilling or engraving.
- Plunge Speed (%) - The speed the z-axis travels when lowering the tool into the material.
- Surface Offset (mm) - This value would typically match the thickness of material you intend engraving. You will also need to position the Z-axis to this value, when setting the vertical position of the Multitool toolhead, in the dove-tail clamp - the tip of the tool bit should be lowered to just touch the top of the material.
- Pre Engrave Dwell (ms) - The time (in milli-seconds) that the tool stays at the start point once plunged into the material, before moving in an X/Y direction.
- Engrave Depth (mm) - The total depth the tool bit will plunge into the material - from the top down.
- Max Pass Depth (mm) - The maximum allowable plunge depth of a single pass. For example if the Engrave Depth is set to 1mm and the Max Pass Depth is set to 0.5mm, Tooli will make two passes to reach the Engrave Depth.
- XY Engrave Speed (%) - The speed that Tooli travels when the tool bit is in the material (100% equals 10m/min).
- Infill Offset (%) - The offset distance (or stepover) used to create an infill toolpath - a percentage of the above 'Tool Diameter'. Typically this would be set to between 80% and 100%, when an infill is required. Set to '0', if no infill is required.
- Path Direction - The direction the toolpath will travel around the perimeter of a closed shape.
- Inside/Outside/On-path - The position of the tool bit, relative to the SVG path. Inside will produce a toolpath that is offset inside a selected closed shape - half the Tool Diameter. Outside will produce a toolpath that is offset outside a selected closed shape - half the Tool Diameter. On-path does not apply an offset when creating a toolpath.
Settings
Once you have put in your settings click OK and you will see the selected line will now have green arrows at various points. This indicates a toolpath has been created and also shows the direction of the path.
Exporting a toolpath
Once you are happy with your toolpath it's time to export it. Exporting the toolpath will make a GCode file that can be sent to your Tooli using the Tooli Control app.
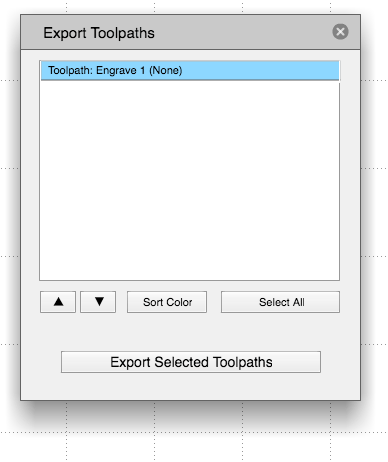
To Export yout toolpath/s choose 'Export toolpaths' from the Export menu. Alternately you can simply hold down the Ctrl key on your keyboard and press 'E'. In the Export dialogue box select which toolpaths you wish to export (selected toolpaths will be highlighted in blue) then click 'Export selected toolpaths'.
There is also an opportunity in the Export dialogue box to change the order of the toolpaths with the up/down arrows before exporting. You can also tell Art2Gcode to sort them by the Color ID, so you don't have to change your tools unnecessarily - will group by Color ID and sort into alphabetical order. Tooli will process toolpaths in the same order as shown here - top to bottom.