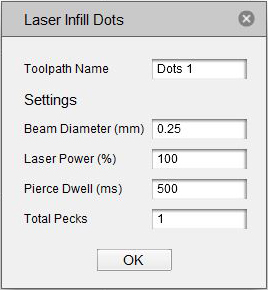
Laser Path / Laser Infill Dots
Create Laser Tool Pass
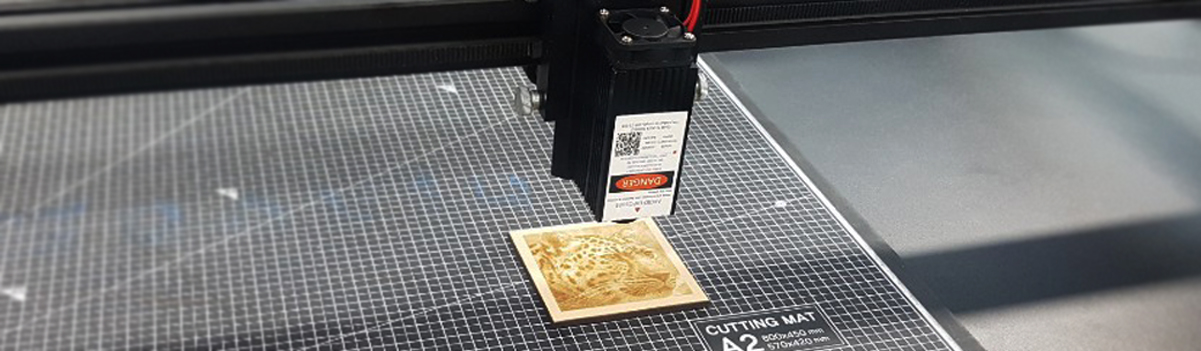
The laser tool is used for image imprinting or cutting.
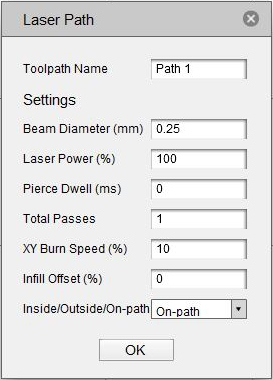
You will be asked to specify the following:
- Toolpath Name - This is optional. Allocating a meaninful name allows you to identify and sort toolpaths more easily - this becomes especially important if you are working in a complex file with multiple toolpaths.
- Beam Diameter(mm):Set laser output thickness. The default setting is 0.25mm.
- Laser Power(%):The default setting is 100%, adjustable in the control box.
- Pierce Dwell(ms): - Set the travel time for the following tasks. 'Laser Path' works in default 0 ms and is set to default 500 ms for 'Laser Infill Dots'.
- Total Passes: - Set the number of repeat runs on the tool pass. Use when you want the same job to run repeatedly.
- XY Burn Speed(%): - Set the speed at which the laser tool moves to the X, Y axis. The default setting is 10% and speed can be adjusted in the control box.
- Infill Offset(%): - Fill toolsetting the offset value required for the pass. Set to '0' if not required.
- Inside/Outside/On-path: - Inside moves the toolpath inward by the value set in 'Infill Offset', Outside moves the toolpass path outward by the value set in 'Infill Offset', On-path moves the specified path.
- When you click OK after entering the settings, the selected lines will have green arrows at various points. Indicates that a tool pass has been created and indicates the direction of the path.
Settings
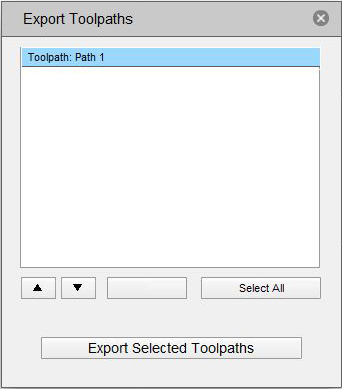
Export Toolpaths
When the tool pass operation is complete, the following is an export operation: Exporting a tool pass converts it into a GCode file that is available.
If you want to export a tool pass, simply click Export Toolpaths in the Export menu to run.
If you want to use the shortcut, hold down the Ctrl key and press the E key. The selected tool pass is highlighted in blue and can be exported by clicking on the highlighted part and clicking the Export Selected Toolpaths button.
If you create more than one tool pass, you can also select the desired tool pass and then use the up and down buttons to change the order of the toolpass.
Laser image marking
Import Image : From the File menu, click 'Open Image File' and open the desired image. The Image Position window allows you to place the image anywhere you want.
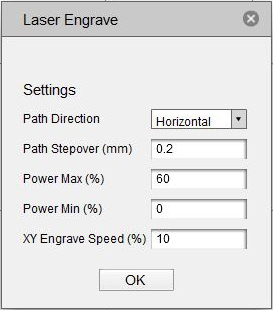
Settings
Path Direction:
Set tool pass direction.'Horizontal' moves the tool pass horizontally.
'Vertical' moves the tool pass vertically.
'Diagonal' moves the tool pass diagonally.
Path Stepover(mm):
Set laser output movement interva.l
Power Max(%):
Laser maximum power setting.
Power Min(%):
Laser minimum power setting.
XY Engrave Speed(%):
The speed that Tooli travels when the tool bit is in the material